All posts by mrscottm

Compiz Release Announcement – 0.8.12

Hello again. We have joined forces with the mate-compiz team and adopted the new name, Compiz Reloaded. We’ve also moved to github and Compiz 0.8.12 is ready. Here is the changelog:

– Add font family configuration for plugins that draw text such as Group/Tab, Scale Window Title Filter and Workspace Names plugins
– Lessen probability of “white glitches” that happen on resize using gtk-window-decorator and emerald
– gtk-window-decorator, emerald, ccsm, simple-ccsm and fusion-icon support both gtk2 and gtk3
– Fix right click near top edge of maximized windows in gtk-window-decorator and emerald
– Add an option to emerald-theme-manager to disable shading when titlebar is scrolled
– Rename plugins-unsupported to plugins-experimental and add many more plugins
– Change minimum and default amount of waves to 0 for Magic Lamp animation
– Add support for a Super Maximize button in emerald (toggles fullscreen)
– Various fixes for ccsm, simple-ccsm and fusion-icon
– Address vs problem more fully
– Increase maximum Mipmap LOD for Blur plugin
– Move Desktop Wall plugin to core
– Lots of additional Mate support
– Fix crash related to animations
– Fix memory leaks in emerald

The packages can be found here.

There is a script used to install the compiz suite. To use it:

Step 1) – Install Xubuntu 15.10 or your variant of debian-based Linux distribution with sudo installed.

Step 2) – Install git

$ sudo apt-get install git

Step 3) – Download the build script set. Optionally omit -b release-0.8.12 to build latest compiz-reloaded master

$ git clone git://northfield.ws/compiz/scripts -b release-0.8.12

Step 4) – Run the INSTALL script

$ ./scripts/go

Step 5) – Start ccsm by typing ccsm in the terminal and verify it runs

$ ccsm

Step 6) – Enable basic plugins such as Window Decoration, Move Window, Place Window, Resize Window and maybe Wobbly so you know it’s working

Step 7) – Start compiz with

$ compiz --replace ccp

Step 8) – Start a compiz window decorator

$ gtk-window-decorator --replace

If everything is working, then congratulations! You can add ‘gtk-window-decorator’ (without quotes) to ccsm>Effects>Window Decoration>Command field so gtk-window-decorator starts when compiz does. If not, you can ask in #compiz or #compiz-reloaded on chat.freenode.net. Enjoy!

AUDIENCE: This information is targeted toward those familiar with Linux distributions and FOSS.

INFORMATION: The script set includes an uninstall script used to remove everything. Run ./scripts/uninstall to use it.

WARNING: This software and other 0.8.x versions may conflict with any 0.9.x compiz, ccsm, emerald or other compiz 0.9.x components.

DISCLAIMER: Not responsible for unhappy camping, confused vulkans or exploding pixels.

32bit chroot environment on 64bit Ubuntu

Recently, I wanted to setup a chroot environment to build a 32bit library on 64bit host platform. After failing several times trying different things, reading man pages and scouring the web for a solution, I did not find what I was looking for. So, I decided to make this post. Here is what I came up with.

Components:

  1. debootstrap
  2. schroot

Assumptions:

  1. Ubuntu Trusty 64bit host
  2. Ubuntu Trusty 32bit target
  3. Target directory /opt/chroot/trusty-i386/
  4. You know what you’re doing

TLDR:

Install debootstrap and schroot:

# apt-get install debootstrap schroot

Replace your-user-name with the name of your user in the following and put it in /etc/schroot/schroot.conf:

[trusty]
description=Trusty Tahr (i386)
directory=/opt/chroot/trusty-i386
users=your-user-name
root-groups=root
preserve-environment=true
personality=linux32

Run these commands (once) to setup the environment:

# export target_dir="/opt/chroot/trusty-i386"
# apt-get install debootstrap schroot
# debootstrap --include=apt,apt-utils,sudo,dialog --variant=buildd --foreign --arch i386 trusty "$target_dir" http://archive.ubuntu.com/ubuntu/
# chroot "$target_dir" debootstrap/debootstrap --second-stage
# bash -c "echo \"chroot\" > \"$target_dir\"/etc/debian_chroot"
# bash -c "echo \"deb http://us.archive.ubuntu.com/ubuntu/ trusty main restricted universe multiverse\" >> \"$target_dir\"/etc/apt/sources.list"
# bash -c "echo \"deb-src http://us.archive.ubuntu.com/ubuntu/ trusty main restricted universe multiverse\" >> \"$target_dir\"/etc/apt/sources.list"
# chroot "$target_dir" apt-get update
# chroot "$target_dir" locale-gen $LANG

Use this script to enter the chroot (run as user):

#!/bin/bash

target_dir="/opt/chroot/trusty-i386"

sudo mount -o bind /proc "$target_dir"/proc/
sudo mount -o bind /sys "$target_dir"/sys
sudo mount -o bind /dev "$target_dir"/dev
sudo mount -o bind /dev/pts "$target_dir"/dev/pts
sudo mount -o bind /home "$target_dir"/home

sudo cp /etc/resolv.conf "$target_dir"/etc/resolv.conf
sudo cp /etc/hosts "$target_dir"/etc/hosts
sudo cp /etc/passwd "$target_dir"/etc/passwd
sudo cp /etc/shadow "$target_dir"/etc/shadow
sudo cp /etc/group "$target_dir"/etc/group
sudo cp /etc/services "$target_dir"/etc/services
sudo cp /etc/protocols "$target_dir"/etc/protocols
sudo cp /etc/networks "$target_dir"/etc/networks

schroot -c trusty

sudo umount "$target_dir"/proc/ "$target_dir"/sys/ "$target_dir"/dev/pts "$target_dir"/dev/ "$target_dir"/home

To remove the chroot environment completely:

rm -rf /opt/chroot/trusty-i386/*

Notes:

Using schroot is optional, you should be able use the environment ‘normally’ with chroot. I’m not sure why the files in /etc/schroot/default/ are seemingly unused, possibly something to do with a missing schroot config script. The debootstrap program completes leaving /etc/apt/sources.list* empty, perhaps something to do with debian bug #736995, so we populate the sources.list file manually. You may add additional packages you want installed to the –include line. Running debootstrap with –second-stage in the chroot installs these additional packages amongst other things. We also create /etc/debian_chroot with the contents “chroot” so the command prompt is prefixed with “(chroot)”, making it clear that it’s not running the host shell. Installing apt-utils and running locale-gen isn’t particularly necessary but at least it gets rid of some annoying messages when running certain dpkg related commands. The script shown mounts the important directories and copies relevant files needed to chroot into a working environment. One caveat is that it might ask for password after exit for umount. Optionally, corresponding fstab entries could be made and copy the relevant files once, so only the schroot command would be needed. This should be enough to login as your user with access to $HOME and to build and run applications, including X11 apps. Cheers.

Compiz Release Announcement – 0.8.10

It took a bit of setup and cook time but compiz 0.8.10 tarballs are ready now including addons-experimental plugin package. Anyone who has installed compiz before knows it can be confusing so here, I will focus on installing 0.8.10 using the tarballs.

Step 1)  –  Install Xubuntu 14.10 or your variant of *buntu based Linux distribution with sudo installed.

Step 2)  –  Open a terminal

Step 3)  –  Install git

$ sudo apt-get install git

Step 4)  –  Download the build scripts with

$ git clone git://northfield.ws/compiz/scripts -b release-0.8.10

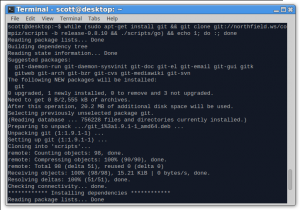
Step 5)  –  Run the INSTALL script

$ ./scripts/INSTALL

terminal

Step 6)  –  Start ccsm by typing ccsm in the terminal and verify it runs

$ ccsm

Step 7)  –  Enable basic plugins such as Window Decoration, Move Window, Place Window, Resize Window and maybe Wobbly so you know it’s working

Step 8)  –  Start compiz with

$ compiz –replace ccp

Step 9)  –  Open another terminal

Step 10)  –  Start a compiz window decorator

$ emerald –replace

If everything is working, then congratulations! You can add ’emerald’ (without quotes) to ccsm>Effects>Window Decoration>Command field so emerald starts when compiz does.  If not, you can ask in #compiz or #northfield on irc.freenode.net using your IRC client or visit wiki.compiz.org. Enjoy!

AUDIENCE: This information is targeted toward those familiar with Linux distributions and GNU open source software.

INFORMATION: The compiled runtime executable files and libraries will be installed to /usr/ and icons for ccsm can be found in /usr/share/ccsm/icons/hicolor/scalable/. Emerald includes emerald-theme-manager which can be run from a terminal. To remove, run ‘make uninstall’ in each of the source directories in ~/src/compiz/.

WARNING: This software and other 0.8.x versions may conflict with any 0.9.x compiz, ccsm, emerald or other compiz 0.9.x components.

DISCLAIMER: Not responsible for soggy corn flakes, mistreated kittens or spontaneously combusting laptops.

Compiz Maintenance

Hello again. It’s been awhile and now it’s time for another blog post. Included are the details of a compiz maintenance routine outline and release schedule preview.

For those that do not keep track, here is a general overview. My name is Scott Moreau and I’ve been working on compiz for about 8 years by wearing the hats of support, script writer, code contributer and now, maintainer. Over time, many left the project entirely. In the past 4 years, I have been maintaining the official upstream compiz with the assistance of long time server maintainer, Guillaume Seguin. Fortunately, it hasn’t been too much work and graphics drivers have improved greatly thanks to companies like Intel, AMD, RedHat, Novell, Canonical, Collabora, Mozilla, Google, Valve and the many interesting people they’ve employed. Without further ado, here is the general road map outline as it stands currently:

1) Take a snapshot of the preserved original C implementation  of all compiz components (currently 0.8.9) including patches we’ve tossed in to keep things going, and make a release dubbed 0.8.10.

2) Test thoroughly

2b) Bump version to 0.8.11

3) Work out obvious, easily fixable problems and consider small improvements, with a strong focus on defaults.

4) Make an eventual 0.8.12 release, when it’s ready.

5) …


I am working on plugins-experimental, a collection of plugins that never really saw the light of day. Not only are these great plugins, but I would like to present this as a celebration of their works and contributions to compiz development throughout the years.

Finally, I would like to thank all of the contributers, developers and testers alike, especially those that have worked hard to improve open source software we cherish today and will continue to use for many years to come. Here is a list of talented individuals, sorry if I’m forgetting anyone.

Sam Lantinga

Ryan Gordon

Richard Goedeken

David Reveman

Pierre Bourdon

Dennis Kasprzyk

Danny Baumann

Guillaume Seguin

Sam Spilsbury

David Richards

Kristian Hoegsberg

Pekka Paalanen

Kristian Lyngstøl

Dave Airlie

All the testers and users worldwide…

Wayland Wobbly Whistles

I found some time and inspiration to resume working toward wobbly wayland surfaces. After making decent progress, it’s time for another blog entry.

Effects such as wobbly windows are argued by some to be a blatant waste of time for both developers and users. However, many still enjoy wobbling their windows despite the controversy. Some power users claim that the mindless wobbling is a welcome brain rest during other tasks. Critics aside, the effect continues to live on in different forms and implementations.

In this iteration, I decided to port the original compiz plugin to wayland surfaces. First, I isolated the code to identify the algorithm inputs and bound the output to a more easily portable format. Then I worked on massaging it into the compositor code, creating a rudimentary plugin API. In the process, the zoom code was also isolated in it’s own plugin. For the moment, plugins aren’t loaded automatically and must be specified in the config file.

Surprisingly, the model positioning code is the most complicated issue because the plugin must render such that the surface position is synced with the compositor when the wobbling cycles are complete. One annoying positioning problem was related to a combination of rotating and resizing but I managed to track down the core issue and fix this case.

The way opaque and blend regions are handled requires duplicate rendering; one with the opaque rbgx shader and another pass for blended rgba. Since wobbly requires additional arbitrary vertices, it’s not really feasible to draw two different regions. For now, it uses the usual rgba shader if the blend region is not empty and the rgbx shader otherwise.

Further plans include writing an interface to talk to the compositor from a GUI and more compiz-like plugins. Check back later for more updates.

Wobbly Standalone GLES2

I contemplated porting compiz wobbly plugin to a wayland compositor for some time now. I decided to break the problem down and familiarize myself with the code better by implementing the wobbly model outside of compiz.

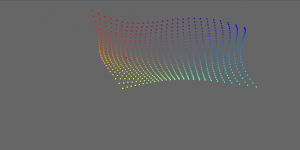
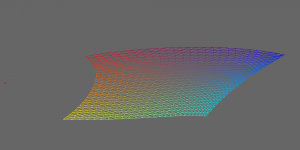
For those that don’t know, wobbly is a piece of code that allows windows on your desktop to wobble, namely when they’re dragged or moved. In a GL compositor, windows are surfaces that consist of a series of points. Each point is called a vertex. The image of the surface is stretched across these points in a process called texture mapping. The vertex computation algorithms are responsible for the final on-screen position of the vertices and the result of rendered objects. This part of the code is where the wobbly magic happens.

wobbly-shot-2

I had several ideas on how to go about attempting to port more compiz functionality to a wayland compositor. There are two main functional parts of a compositing system:

– The underlying windowing system

– The renderer that composites the data

In the case of compiz, this is X and GL respectively. The X component is what we need to remove. In order to port the interesting compiz functionality to a wayland compositor, it is reasonable to write it from scratch without reference to the compiz code at all. This was the case with zoom in weston, where I implemented a stripped down version after doing the required matrix math.

There are some plugins that are more dependent on X than others, namely (and not surprisingly), the Window Management plugins.
The plugins that provide more bling than functionality are sometimes easier to port because it’s more GL and less X.

One idea I came up with was to create a program that demos some of the effects by implementing a fake desktop with fake windows, excluding any platform-specific code. I decided to dissect the wobbly window plugin and learned many interesting things. I grabbed a copy of es2tri.c from mesa demos and begin hacking it together.

wobbly-shot-1

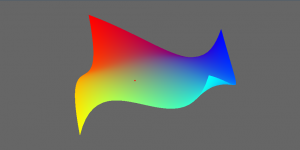
The first thing I noticed is that wobbly renders using GL_QUADS. This means that the index assignment must be changed since we’re using GL_TRIANGLES. I managed to compare the values of the vertices from my wobbly code to the real thing and debug the position calculations before writing the code to actually draw them. Indeed, the vertices were correct but the indices were not. After fixing everything up, we have a wobbly surface using mouse click-n-drag events as input.

Ok, so the demo is rendering to an X window which means it’s still hooked to X but only for input and output. It should be relatively simple to port it to other platforms with EGL support. You can find the code here.


wobbly-shot-3