Category Archives: Random

Random other projects and computing jargon

Streaming RTSP directly to browsers

Let’s not sugar coat it, streaming video is a complex topic. If every browser had the same video player, it might make things a bit easier. But of course, they don’t. So, I’ll try to dumb this down, keep it short and make it as simple as possible.

If you have some RTSP H.264 streams that you want to stream to Firefox or Chrome with minimal latency, you might be in for a treat. Using nodejs and ffmpeg, we can serve up the streams while convincing the browser to play the stream immediately while buffering with minimal latency. How? As I found, it is not easy. But let’s act like it was, shall we?

In a nutshell, a browser first makes an initial GET for the url and the server replies with a video/mp4 mime type header with 200 status. We start up ffmpeg and have it write to stdout but we don’t send any of the data on this request. This behooves the client to make a range request. Next, on the range request, the client is expecting a file so it asks for portions of it. Here, we always tell it the start is 0 and do some math to tell it what range and length to expect, based on the bytes we have so far, and send 206 status. Then, we start sending the data. Getting this right was only half the battle though..

TL;DR, I checked the agent string to see if it’s chrome or not. If it’s chrome, we use `ffmpeg -f matroska` but for firefox, we have to use `ffmpeg -f mp4` since it doesn’t have matroska support. The confusing thing was that the mime type could not be video/x-matroska because that caused the browser to attempt downloading the file. Now on to the code.

The following is a snippet to stream RTSP directly to firefox or chrome browsers:

function serve_rtsp(req, res, ip, user, pass) {
    user_agent_string = req.get('user-agent');
    const range = req.headers.range;
    if (range)
    {
        if (!running)
        {
            res.end();
            return;
        }
        const start = 0;
        const end = Math.max(total_length, 1024 * 1024 * 32);
        const chunk_size = end + 1;
        res.writeHead(206, {'Accept-Ranges': 'bytes', 'Content-Range': 'bytes ' + start + '-' + end + '/' + chunk_size, 'Content-length': chunk_size, 'Content-Type': 'video/mp4', 'Connection': 'keep-alive'});
        ffmpeg.stdout.unpipe();
        ffmpeg.stdout.pipe(res);
        return;
    } else
    {
        res.writeHead(200, {'Accept-Ranges': 'bytes', 'Content-Type': 'video/mp4', 'Connection': 'keep-alive'});
    }
    if (running)
    {
        ffmpeg.kill("SIGINT");
        total_length = 0;
        clearTimeout(ffmpeg_timer);
    }
    if (user_agent_string.includes("Chrome"))
    {
        ffmpeg = child_process.spawn("ffmpeg",[
        "-i", 'rtsp://' + user + ':' + pass + '@' + ip + ':80',
        "-f", "matroska",  // File format
        "-c", "copy",      // No transcoding
        "-t", "60",        // Timeout
        "-"                // Output (to stdout)
        ]);
    }
    else
    {
        ffmpeg = child_process.spawn("ffmpeg",[
        "-i", 'rtsp://' + user + ':' + pass + '@' + ip + ':80',
        "-f", "mp4",       // File format
        "-movflags", "empty_moov+frag_keyframe",
        "-c", "copy",      // No transcoding
        "-t", "60",        // Timeout
        "-"                // Output (to stdout)
        ]);
    }
    running = true;
    res.end();
    ffmpeg.stdout.on('data', ffmpeg_handle_data);
    ffmpeg_timer = setTimeout(function() {
        running = false;
    }, 60000);
}

I hope this is helpful to someone out there. If you do find it useful and want to say thanks, you can donate a coffee on northfield.ws.
 

32bit chroot environment on 64bit Ubuntu

Recently, I wanted to setup a chroot environment to build a 32bit library on 64bit host platform. After failing several times trying different things, reading man pages and scouring the web for a solution, I did not find what I was looking for. So, I decided to make this post. Here is what I came up with.

Components:

  1. debootstrap
  2. schroot

Assumptions:

  1. Ubuntu Trusty 64bit host
  2. Ubuntu Trusty 32bit target
  3. Target directory /opt/chroot/trusty-i386/
  4. You know what you’re doing

TLDR:

Install debootstrap and schroot:

# apt-get install debootstrap schroot

Replace your-user-name with the name of your user in the following and put it in /etc/schroot/schroot.conf:

[trusty]
description=Trusty Tahr (i386)
directory=/opt/chroot/trusty-i386
users=your-user-name
root-groups=root
preserve-environment=true
personality=linux32

Run these commands (once) to setup the environment:

# export target_dir="/opt/chroot/trusty-i386"
# apt-get install debootstrap schroot
# debootstrap --include=apt,apt-utils,sudo,dialog --variant=buildd --foreign --arch i386 trusty "$target_dir" http://archive.ubuntu.com/ubuntu/
# chroot "$target_dir" debootstrap/debootstrap --second-stage
# bash -c "echo \"chroot\" > \"$target_dir\"/etc/debian_chroot"
# bash -c "echo \"deb http://us.archive.ubuntu.com/ubuntu/ trusty main restricted universe multiverse\" >> \"$target_dir\"/etc/apt/sources.list"
# bash -c "echo \"deb-src http://us.archive.ubuntu.com/ubuntu/ trusty main restricted universe multiverse\" >> \"$target_dir\"/etc/apt/sources.list"
# chroot "$target_dir" apt-get update
# chroot "$target_dir" locale-gen $LANG

Use this script to enter the chroot (run as user):

#!/bin/bash

target_dir="/opt/chroot/trusty-i386"

sudo mount -o bind /proc "$target_dir"/proc/
sudo mount -o bind /sys "$target_dir"/sys
sudo mount -o bind /dev "$target_dir"/dev
sudo mount -o bind /dev/pts "$target_dir"/dev/pts
sudo mount -o bind /home "$target_dir"/home

sudo cp /etc/resolv.conf "$target_dir"/etc/resolv.conf
sudo cp /etc/hosts "$target_dir"/etc/hosts
sudo cp /etc/passwd "$target_dir"/etc/passwd
sudo cp /etc/shadow "$target_dir"/etc/shadow
sudo cp /etc/group "$target_dir"/etc/group
sudo cp /etc/services "$target_dir"/etc/services
sudo cp /etc/protocols "$target_dir"/etc/protocols
sudo cp /etc/networks "$target_dir"/etc/networks

schroot -c trusty

sudo umount "$target_dir"/proc/ "$target_dir"/sys/ "$target_dir"/dev/pts "$target_dir"/dev/ "$target_dir"/home

To remove the chroot environment completely:

rm -rf /opt/chroot/trusty-i386/*

Notes:

Using schroot is optional, you should be able use the environment ‘normally’ with chroot. I’m not sure why the files in /etc/schroot/default/ are seemingly unused, possibly something to do with a missing schroot config script. The debootstrap program completes leaving /etc/apt/sources.list* empty, perhaps something to do with debian bug #736995, so we populate the sources.list file manually. You may add additional packages you want installed to the –include line. Running debootstrap with –second-stage in the chroot installs these additional packages amongst other things. We also create /etc/debian_chroot with the contents “chroot” so the command prompt is prefixed with “(chroot)”, making it clear that it’s not running the host shell. Installing apt-utils and running locale-gen isn’t particularly necessary but at least it gets rid of some annoying messages when running certain dpkg related commands. The script shown mounts the important directories and copies relevant files needed to chroot into a working environment. One caveat is that it might ask for password after exit for umount. Optionally, corresponding fstab entries could be made and copy the relevant files once, so only the schroot command would be needed. This should be enough to login as your user with access to $HOME and to build and run applications, including X11 apps. Cheers.

Wobbly Standalone GLES2

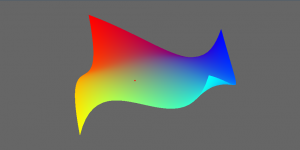
I contemplated porting compiz wobbly plugin to a wayland compositor for some time now. I decided to break the problem down and familiarize myself with the code better by implementing the wobbly model outside of compiz.

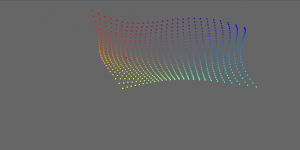
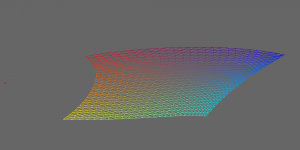
For those that don’t know, wobbly is a piece of code that allows windows on your desktop to wobble, namely when they’re dragged or moved. In a GL compositor, windows are surfaces that consist of a series of points. Each point is called a vertex. The image of the surface is stretched across these points in a process called texture mapping. The vertex computation algorithms are responsible for the final on-screen position of the vertices and the result of rendered objects. This part of the code is where the wobbly magic happens.

wobbly-shot-2

I had several ideas on how to go about attempting to port more compiz functionality to a wayland compositor. There are two main functional parts of a compositing system:

– The underlying windowing system

– The renderer that composites the data

In the case of compiz, this is X and GL respectively. The X component is what we need to remove. In order to port the interesting compiz functionality to a wayland compositor, it is reasonable to write it from scratch without reference to the compiz code at all. This was the case with zoom in weston, where I implemented a stripped down version after doing the required matrix math.

There are some plugins that are more dependent on X than others, namely (and not surprisingly), the Window Management plugins.
The plugins that provide more bling than functionality are sometimes easier to port because it’s more GL and less X.

One idea I came up with was to create a program that demos some of the effects by implementing a fake desktop with fake windows, excluding any platform-specific code. I decided to dissect the wobbly window plugin and learned many interesting things. I grabbed a copy of es2tri.c from mesa demos and begin hacking it together.

wobbly-shot-1

The first thing I noticed is that wobbly renders using GL_QUADS. This means that the index assignment must be changed since we’re using GL_TRIANGLES. I managed to compare the values of the vertices from my wobbly code to the real thing and debug the position calculations before writing the code to actually draw them. Indeed, the vertices were correct but the indices were not. After fixing everything up, we have a wobbly surface using mouse click-n-drag events as input.

Ok, so the demo is rendering to an X window which means it’s still hooked to X but only for input and output. It should be relatively simple to port it to other platforms with EGL support. You can find the code here.


wobbly-shot-3